This describes how to setup a Xymon server for monitoring your systems. It assumes that you are setting up a full Xymon server - i.e. either you do not have a Big Brother server, or you will replace it completely with Xymon.
Note to Big Brother users: Although some of the Xymon tools have evolved from the bbgen toolkit that was used on top of a Big Brother server installation, the Xymon versions of these tools now require that you run Xymon - not Big Brother. If you are migrating from Big Brother to Xymon, then you should follow the migration guide.
You may want to check the list of common systems which has brief instructions for installing Xymon for these types of systems.
There are a few things you should check before you begin to install Xymon. Don't be scared of the number of items here - it is likely that you already have most or all of it in place.
This includes most browsers available today - Internet Explorer 5 or later, all Mozilla/Firefox versions, Konqueror, Netscape 6 and several others. The old Netscape 4.x browsers are known NOT to work.
Xymon is written for Unix-based systems, e.g. Linux, FreeBSD, or Solaris. It will probably work on any Unix-like system that supports the Unix System V IPC mechanisms (shared memory, semaphores) - that should be just about anything Unix-like you are likely to have.
Xymon uses 8 shared memory segments, ranging in size from 32 KB to 512 KB (2336 KB total) in the default configuration; and 8 sets of 3 semaphores. Experience shows that some systems need tuning to provide the necessary IPC resources that Xymon uses. Specifically, when installing on Solaris you must increase the "shmseg" kernel parameter from the default 6 to at least 8. Since other programs on your system may also use shared memory, a higher value may be required. See http://www.xymon.com/archive/2005/08/msg00183.html for more information about these issues.
Xymon is designed with a web-based front-end. So you should have a webserver such as Apache running on the server where you install Xymon.
Xymon is written in C, so you need a working C compiler, e.g. gcc. You will also need a "make" utility - many systems have one by default, but you need to use the GNU make utility. On some systems, this is pre-installed as "gmake" or "gnumake". The configure-script checks this for you.
HP-UX users should note that the HP-supplied C compiler is known to mis-compile the lib/environ.c file, and produces an output file lib/environ.o of length 0 bytes. HP-UX users on the Xymon mailing list agree that the default C compiler shipped with HP-UX should not be used to compile Xymon - it is only for re-building the HP-UX kernel. The GNU C compiler works fine on HP-UX. More details in this e-mail from the Xymon mailing list.
Xymon relies on a number of Open-Source libraries - these must be installed before you start building Xymon. On many systems you already have these pre-installed - they are commonly installed by default on Linux systems, and FreeBSD has all of them in the "ports" collection.
Note: Although many systems have these libraries pre-installed, they often include only the run-time libraries and not the files that are needed to compile and build programs such as Xymon. So if you think you have all of these libraries installed but Xymon will not build, do check that you have the development files installed as well. Often these are in packages called "something-dev".
The configure-script will attempt to locate all of these libraries on your system, and complain if the required ones are missing.
A core element of Xymon is a network daemon. To keep your system secure and limit the amount of damage that can be done if someone finds a security problem in Xymon, I strongly recommend that you create a dedicated userid for the Xymon programs. This user should not be a member of any other groups on your system.
Xymon will install the xymonping tool as setuid-root(only on the Xymon server). This program requires root privileges to be able to perform network "ping" tests. It will drop root privileges immediately after obtaining the network socket needed for this, and will not run with root privileges at all while handling network traffic or doing file I/O.
After unpacking Xymon from the tar-file, run the configure script. This script asks a series of questions, but all of the questions have a reasonable default response. So if you are in doubt about what to answer, use the default setting. You can see what it looks like.
When the configure script finishes, it tells you to run make to build the Xymon programs. If your default "make" tool is not GNU make, you should use the command for running GNU make instead, e.g. gmake. You will now see a lot of commands being run to build the programs, it usually takes a minute or two.
When it is finished, you finish the installation by running make install.
The first time you run make install, besides installing the Xymon programs it also creates the default directory structure used by Xymon, and installs an initial set of configuration files that you can use as the basis for setting up monitoring of your entire network.
It is safe to run make install when upgrading a Xymon server. It installs the programs, adds new template-files that were not present in your previous version, and updates your configuration files with any new sections that have been added. Any changes you have made yourself are preserved.
Xymon uses a web-based front-end. So you need to configure your webserver so that it knows where the Xymon webpages can be found, and what CGI scripts can run as part of Xymon. This usually means adding a few lines to your webserver configuration that sets up a URL which points at the ~/server/www/ directory, and which tells your webserver that the ~/cgi-bin/ directory holds CGI scripts that the webserver should run when they are requested.
If you are using the Apache webserver, you will find the necessary additions to the Apache configuration in ~/server/etc/xymon-apache.conf - it looks like this. After changing the webserver configuration, you probably need to restart the webserver.
If you configured Xymon to put the Administration CGI scripts into a separate
directory (recommended for better security), you will also need to setup the
password-file that controls access to this directory. Use the htpasswd
command both to create the password file and to add or delete users:
	# /usr/sbin/htpasswd -c /usr/lib/xymon/server/etc/xymonpasswd admin
	New password:
	Re-type new password:
	Adding password for user admin
	#
The -c option should only be used the first time, to create the password file. See the Apache documentation for details about how to use htpasswd.
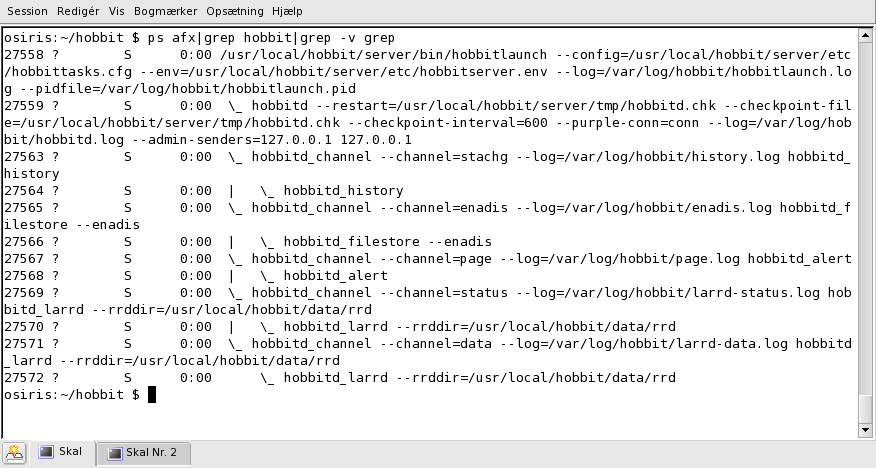
You can now login as the "xymon" user, and run the command ./server/xymon.sh start
to start Xymon. After a few seconds, it should have started and you now have the following
processes running:
Quite a few, but all of them controlled by the master xymonlaunch process. A quick run-down of what each of them does:
After a couple of minutes, you should have data available for the Xymon server itself.
If you open a webbrowser with the Xymon URL - usually http://your.server/xymon/ - you
should see something like this:
Each of the little faces indicate an item that is being monitored for this host. Here you see the default set of items that the Xymon installation sets up for a Xymon server:
You can click on each of the green icons to see a more detailed status.
Congratulations, you now have a running Xymon server!
The next step is to configure it to monitor your servers and applications, and to set up the alerts to send you e-mail, call a pager, or send an SMS in case of trouble. For that, see the Xymon configuration guide.
This appendix details how to install Xymon on some of the more common types of systems.
RHEL6 has all of the necessary tools except fping included in the core distribution.
groupadd xymon
useradd -g xymon -m xymon

yum install gcc make

wget http://fping.org/dist/fping-3.2.tar.gz
tar zxf fping-3.2.tar.gz
cd fping-3.2
./configure
make && make install
cd ..

yum install pcre-devel openssl-devel openldap-devel rrdtool-devel
cd xymon-4.3.10
./configure --server
make && make install
Copy rpm/xymon-init.d to /etc/init.d/xymon and make sure it is executable. Edit /etc/init.d/xymon and change "/usr/lib/xymon" in the DAEMON line to the directory where you installed Xymon - e.g. "/home/xymon".
Configure Apache with the Xymon definitions:
ln -s /home/xymon/server/etc/xymon-apache.conf /etc/httpd/conf.d/
To enable automatic start of Xymon and apache:
chkconfig httpd on
chkconfig --add xymon
chkconfig xymon on
RHEL5 does not include RRDtool in the core distribution. So download it and install it in /usr/local/rrdtool. Also, fping is not included.
groupadd xymon
useradd -g xymon -m xymon

yum install gcc make

wget http://fping.org/dist/fping-3.2.tar.gz
tar zxf fping-3.2.tar.gz
cd fping-3.2
./configure
make && make install
cd ..

yum install freetype-devel libpng-devel libart_lgpl-devel tcl-devel
wget http://oss.oetiker.ch/rrdtool/pub/rrdtool-1.2.30.tar.gz
tar zxf rrdtool-1.2.30.tar.gz
cd rrdtool-1.2.30
./configure --prefix=/usr/local/rrdtool
make && make install
cd ..

yum install pcre-devel openssl-devel openldap-devel
cd xymon-4.3.10
./configure --server
make && make install
Copy rpm/xymon-init.d to /etc/init.d/xymon and make sure it is executable. Edit /etc/init.d/xymon and change "/usr/lib/xymon" in the DAEMON line to the directory where you installed Xymon - e.g. "/home/xymon".
Configure Apache with the Xymon definitions:
ln -s /home/xymon/server/etc/xymon-apache.conf /etc/httpd/conf.d/
To enable automatic start of Xymon and apache:
chkconfig httpd on
chkconfig --add xymon
chkconfig xymon on
RHEL4 does not include RRDtool in the core distribution. So download it and install it in /usr/local/rrdtool. Also, fping is not included and some of the development files are in a non-standard location.
groupadd xymon
useradd -g xymon -m xymon

yum install gcc make

wget http://fping.org/dist/fping-3.2.tar.gz
tar zxf fping-3.2.tar.gz
cd fping-3.2
./configure
make && make install
cd ..

yum install freetype-devel libpng-devel libart_lgpl-devel tcl-devel
wget http://oss.oetiker.ch/rrdtool/pub/rrdtool-1.2.30.tar.gz
tar zxf rrdtool-1.2.30.tar.gz
cd rrdtool-1.2.30
./configure --prefix=/usr/local/rrdtool
make && make install
cd ..

yum install pcre-devel openssl-devel openldap-devel
cd xymon-4.3.10
./configure --server --pcreinclude /usr/include/pcre --sslinclude /usr/include/openssl
make && make install
Copy rpm/xymon-init.d to /etc/init.d/xymon and make sure it is executable. Edit /etc/init.d/xymon and change "/usr/lib/xymon" in the DAEMON line to the directory where you installed Xymon - e.g. "/home/xymon".
Configure Apache with the Xymon definitions:
ln -s /home/xymon/server/etc/xymon-apache.conf /etc/httpd/conf.d/
To enable automatic start of Xymon and apache:
chkconfig httpd on
chkconfig --add xymon
chkconfig xymon on
Follow instructions for RHEL4.
Follow instructions for RHEL6.
NOTE: Pre-compiled Debian packages are provided on Sourceforge, along with the source distribution file.
Debian 6 has all of the necessary tools included in the core distribution.
apt-get install apache2 rrdtool librrd-dev libpcre3-dev libssl-dev ldap-utils libldap2-dev fping

# Enable mod_rewrite in Apache
cd /etc/apache2/mods-enabled/
ln -s ../mods-available/rewrite.load .
/etc/init.d/apache2 reload
cd

tar zxf xymon-4.3.10.tar.gz
cd xymon-4.3.10
./build/makedeb.sh 4.3.10
mv debbuild/*.deb ../
cd ..
dpkg -i xymon*deb
Follow instructions for Debian 6.
Perform a standard install, make sure to install the "ports" collection. FreeBSD - in a minimal configuration - does not install any of the Xymon prerequisites, so starting from a minimal configuration you must run these commands to install the various tools and libraries needed. For those packages that have some configuration items, the defaults work fine:
cd /usr/ports/devel/gmake; make; make install
cd /usr/ports/devel/pcre; make; make install
cd /usr/ports/databases/rrdtool12; make; make install
cd /usr/ports/security/openssl; make; make install
cd /usr/ports/net/openldap23-client; make; make install
cd /usr/ports/net/fping; make; make  install
cd /usr/ports/www/apache22; make; make install
Next, run the "adduser" utility and setup the "xymon" user.
After this you are ready to build and install Xymon:
setenv PATH ${PATH}:/usr/local/bin
setenv MAKE gmake
cd ~
gzip -dc xymon-4.3.10.tar.gz | tar xf -
cd xymon-4.3.10
./configure	# All defaults, except group-ID for webserver is "www"
gmake && gmake install
chown 0:0 /home/xymon/server/bin/xymonping
chmod u+s /home/xymon/server/bin/xymonping

ln -s /home/xymon/server/etc/xymon-apache.cnf /usr/local/etc/apache22/Includes
To enable automatic start of Xymon when the server is booted, you must create the /etc/rc.d/xymon script:
#!/bin/sh

. /etc/rc.subr

name="xymon"
start_cmd="${name}_start"
stop_cmd="${name}_stop"

xymon_start()
{
	su xymon /home/xymon/server/xymon.sh start
}

xymon_stop()
{
	su xymon /home/xymon/server/xymon.sh stop
}

load_rc_config $name
run_rc_command "$1"
Make sure the script is executable with
chmod 755 /etc/rc.d/xymon
and add the line
xymon_enable="YES"
to the file /etc/rc.conf
A similar script can be used to start/stop Apache automatically. Use the commands
/usr/local/sbin/apachectl start
and
/usr/local/sbin/apachectl stop
in the apache_start() and apache_stop() functions, respectively.
All of the necessary packages are available from the OpenBSD "ports" collection. Note that when installing OpenBSD, you must install the "xbase" package, since this contains a library that is needed by RRDtool.
After installing the core OpenBSD system, use the ports-collection to install the necessary packages. See OpenBSD FAQ for details about using this.
export PKG_PATH=ftp://ftp.openbsd.org/pub/OpenBSD/`uname -r`/packages/`uname -m`/
pkg_add -v gmake pcre rrdtool openldap-client fping apache-httpd
Note: Check permissions on /usr/local/sbin/fping* - they must be suid root. On OpenBSD 4.6 it has been observed that this is not the case by default, so you must run
chmod u+s /usr/local/sbin/fping*
for them to be usable by the xymon user.
Run the adduser utility to setup the "xymon" user.
Configure, build and install Xymon with these commands. Configuration can use all defaults, except that the webserver group-ID is "_apache2".
gzip -dc xymon-4.3.10.tar.gz | tar xf -
cd xymon-4.3.10
MAKE=gmake ./configure # All defaults except webserver group is "_apache2"
gmake && gmake install
In /etc/apache2/httpd2.conf, add this line at the bottom:
Include /home/xymon/server/etc/xymon-apache.conf
To enable automatic startup, add these commands to /etc/rc.local:
/usr/local/sbin/apachectl2 start
su xymon /home/xymon/server/xymon.sh start
All of the necessary libraries and tools for building Xymon are available in the OpenCSW archive. This appears to be a newer collection of Open Source tools, replacing the Sun Freeware archive which is now a commercial project. See below for instructions on installing Xymon using the SFW packages.
Follow the
"Getting Started" instuctions on setting up your system to use the CSW archive.
Briefly, this means running these commands (as root):
pkgadd -d http://get.opencsw.org/now
PATH=$PATH:/opt/csw/bin
export PATH
pkgutil -i -y cswpki
cswpki --import
vi /etc/opt/csw/pkgutil.conf	# Define mirror, enable use_gpg and use_md5
pkgutil -U
After setting up the CSW archive tool, you can install the necessary tools
and libraries that Xymon will use:
pkgutil -i -y gcc4core gcc4g++ gmake
pkgutil -i -y pcre libpcre_dev
pkgutil -i -y rrdtool rrdtool_dev
pkgutil -i -y openssl libssl_dev
pkgutil -i -y openldap_client openldap_dev
pkgutil -i -y fping
The "fping" tools must be installed suid-root so that the xymon user can run them:
chmod u+s /opt/csw/sbin/fping*
Now, create the xymon user:
groupadd xymon; useradd -g xymon -d /export/home/xymon -m xymon
Configure and build Xymon. All tools and libraries should be automatically detected, but it is necessary to explicitly point at the CSW OpenSSL libraries, overriding the default Solaris version of OpenSSL:
PATH=$PATH:/usr/ccs/bin
export PATH
cd xymon-4.3.10
MAKE=gmake ./configure --server --sslinclude /opt/csw/include --ssllib /opt/csw/lib
gmake && gmake install
Install Apache and add the Xymon webserver configuration:
pkgutil -i -y apache2
ln -s /export/home/xymon/server/etc/xymon-apache.conf /opt/csw/apache2/etc/extra/
Add
Include etc/extra/xymon-apache.confto /opt/csw/apache2/etc/httpd.conf.
The CSW Apache implementation supports the Solaris SMF (svcadm) setup, but conflicts with the default Apache version that is installed with Solaris. So disable the default version, and enable the CSW version:
/etc/init.d/apache stop
rm /etc/rc?.d/*apache
svcadm clear cswapache2
To enable automatic startup of Xymon when the server boots, put this into /etc/init.d/xymon:
#!/bin/sh
su xymon /export/home/xymon/server/xymon.sh $*
exit $?
and then enable this via the "legacy" startup scripts by running these commands:
ln -s /etc/init.d/xymon /etc/rc3.d/S80xymon
ln -s /etc/init.d/xymon /etc/rc0.d/K20xymon
ln -s /etc/init.d/xymon /etc/rc1.d/K20xymon
ln -s /etc/init.d/xymon /etc/rcS.d/K20xymon
All of the necessary libraries and tools for building Xymon are available in the Sun Freeware archive. You must install these packages to build Xymon:
After installing these, you must set PATH and LD_LIBRARY_PATH to pick up the new tools, then you can compile Xymon the usual way:
groupadd xymon
useradd -d /usr/local/xymon xymon
PATH=$PATH:/usr/local/bin:/usr/ccs/bin; export PATH
LD_LIBRARY_PATH=/usr/local/lib; export LD_LIBRARY_PATH
./configure
make
make install
The SunFreeware libraries are installed in /usr/local/lib, which is NOT searched by default by the Solaris runtime linker. You must either set LD_LIBRARY_PATH globally to include /usr/local/lib, or you can use the "crle" utility to add /usr/local/lib to the set of directories searched by default. Typically this means running this command:
crle -c /var/ld/ld.config -l /usr/lib:/usr/lib/secure:/usr/local/lib
The latter method using "crle" is the recommended method, since LD_LIBRARY_PATH settings can be difficult to setup so they work for all invocations of the Xymon binaries.
Xymon is available for OSX 10.6, 10.7 and 10.8 through the macports project.
The ports can be found here:http://www.macports.org/ports.php?by=name&substr=xymon, and there's a page on how to make xymon server on a Mac.